4.24.2011

baby bird easter cupcakes

So, as promised, here are my little Easter cupcakes I made. Of course, the birds look more like Jabba the Hut than cute little bluebird chicks, but they're still cabbage-patch adorable, right?


They seem a little labour-intensive, but they're actually not that tough. I found the idea on Martha Stewart's site, where (of course) they look perfect. I think if I make them again I'll use mini eggs for the bodies, because I had frosting issues. Of course, I also bought minimal ingredients, and instead adapted it for what I had lying around, so you get what you put in...but they still taste delicious! The cake recipe is from here, and is one of my favourites, and I used my usual buttercream recipe from Bakerella. Enjoy!

4.23.2011

creme brulee

Get excited, people! I don't think I'll go all-out on the spelling again, but today it's...crème brûlée! Finally, a way to put all of those yolks from your angel food cake to work!


This tasty treat is actually not as hard or intimidating as it might seem, it was actually pretty straight forward. I based my version on another one from Alton Brown at the Food Network, but because I was too cheap/lazy for some of the ingredients, and had some other ones laying around instead, I did a few swaps. Ready? Here goes...

4.16.2011

angel food cake

Or, as the boy calls it, angel wing cake. Whatever you call it, it's a super light, sweet, tasty cake! It was my mom's birthday on Wednesday, and rather than make her one from a mix, I thought I'd go all out and make one from scratch, since it's her favourite. Just as a head's up, this recipe calls for 12 - yes, one dozen! - egg whites! Have no fear though, because I found a tasty awesome recipe that calls for 6 yolks, so it's not all going to waste, so I'll post that one next weekend. (Spoiler alert - it's creme brulée.) I adapted the recipe from this one, by Alton Brown, on the Food Network website, and it worked like a charm.


4.10.2011

artisan bread - part two

Okay, as promised, round two of the bread experiment...and it's a success!! As of the last post, I was waiting patiently for the bread to finish rising, so that I could hack it up, and bake it. It looked something like this:


Once it's risen for at least two hours (apparently up to 5, or even overnight is okay/better, so whatever floats your boat), and then collapsed - I "helped" mine by dropping the mixing bowl, whoops - you take the dough and the bowl it's in, cover it (I just put loose plastic wrap over it, so gasses could get out), and put it in the fridge. You can leave it in there for up to two weeks, and just hack off the bits you want to make one loaf at a time - perfect, because I don't have the patience usually to wait for several hours for bread to rise!

I hacked off my loaf, about the size of a softball, and sort of kneaded it mid-air. Hold it in your hands and smooth the top, and tuck the excess underneath - kind of like a botched facelift. Put it onto an upside-down baking pan dusted with cornmeal, cover it up with a cloth (a slightly damp cloth is best, according to my mom), and leave it in a warm place for at least half an hour, up to 1 1/2 hours. It won't rise a ton, but it will get a bit bigger.

Before:
After:

That yellowy stuff? Is cornmeal. I honestly didn't know what it was until I bought it. Then I realised that's the same stuff that's on the bottom of bagels...just blew your mind too, didn't it? Thought so.

4.09.2011

artisan bread - part one

Wow guys, this is kind of a big change from my typical, rot-your-teeth-out, deliciously sweet stuff! But the Boy has volunteered to make us minestrone for dinner, so I thought the least I could do was make some lovely bread to go with it! I'm not a huge fan of super complicated recipes, and this one seemed pretty simple. I found a variation of it on a blog, but it's actually from a book (Artisan Bread in Five Minutes a Day), which has lots of suggestions, variations, yadda yadda. I think if I ever actually bought a cookbook, and stopped using the internet almost exclusively for recipes, I'd probably get this one, I love bread that much.

But enough chit chat, here goes. I'll be totally honest and let you all know that I haven't actually finished making this bread yet - in case you missed that from the "part one" in the title. So, fun times, you get to learn along with me! I'm at about the halfway point in the process, so either later tonight or tomorrow I'll finish it up with how the bread turned out, and lots more lovely photos.  Who knows, if it's better than my tried-and-true soda bread recipe, I might be making this from now on.


This is a very current photo of where the bread is at right now:


Awesome, right? I feel like it's going to take over the apartment, so if you don't hear from me again, you'll at least know what the suspect looks like.

4.06.2011

chocolate peanut butter balls

Okay, here they are! I'm posting a little bit later than I'd like, but I couldn't resist the juxtaposition of posting these while I'm watching the Biggest Loser. I'm also eating them while watching it...take that, Jillian! (I have to get some kind of revenge for the pain she inflicts during the 30 Day Shred!)

These are tiny little balls of deliciousness. I had a craving for peanut butter and chocolate a few weeks ago, and literally googled "cocoa powder peanut butter" because that's all I had in the cupboard, and this is what I got:

Looks awesome, right? Right. These things are so easy - no baking, no heat, no sharp objects - so they'd probably be pretty fun to make with kids, if that's your bag. The hardest part about making these puppies is not eating them all right away. Confession time: one time I made a quarter batch, all for myself. And ate it with  a spoon. That's right, they're that good! So let's get down to business...

4.04.2011

stalling for time...

Alright, once again I'm a bit late with the posting - and this isn't even the real thing! Excuses, excuses, I know, but Sunday was kind of hectic, and Saturday moreso. So this is pretty much just a "whoops, sorry, real post is coming soon" type of post.

But! I did do some baking on Sunday. I just did it at my mom's, and didn't really feel up to packing my camera and all that along, on top of everything else I brought with me. Plus, after all the cake we had for dessert, I didn't really think our stomachs could handle more treats. The game plan is to make some tasty peanut butter balls tonight though, so keep an eye out for that post either (much) later tonight, or first thing in the morning.

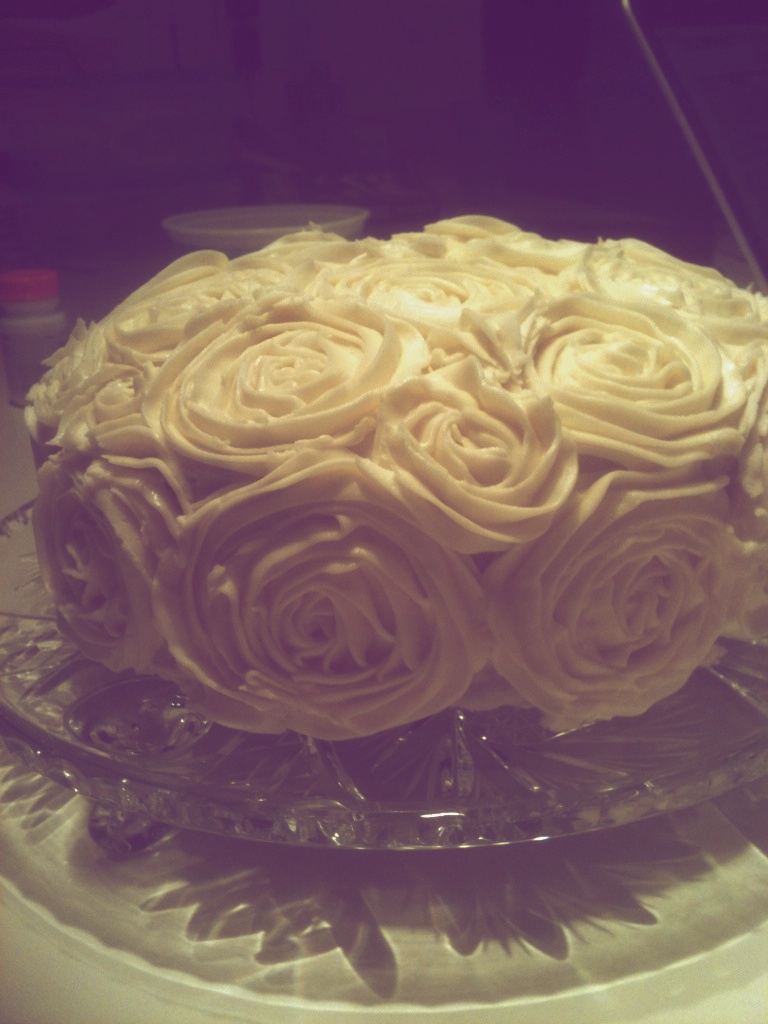
And in the meantime? Let them eat look at cake!


The photos are courtesy of the boy's iPhone, so they're not my usual fancy pants ones, but they'll do! It's dead easy to decorate too! The cake recipe is my favourite devil's food chocolate one, and the tutorial for the rose decorations here. I'm sure anyone could do a much nicer job than I did, I definitely didn't make the buttercream to the right consistency, which made it tough.

Anyway, keep your eyes open for my next (proper) post, which I should definitely get around to by tomorrow night-ish. Hopefully sooner!
c.
Related Posts Plugin for WordPress, Blogger...